Category Archives: Ruffage

Garlic and Herb Oven Fries

IMG_5249

Doesn’t that look good? And to think, it started out looking like this:

IMG_5224

Well that looks pretty good too but we can’t eat it like that, can we? So how do we turn those ingredients into delicious fries? Well I’ll tell you.

IMG_5226

Peel the sweet potato and cut all potatoes into 1/2″ wide fries. Coat with olive oil, season with S&P

IMG_5231

I’m using a silpat here because the last time I made these, the potatoes totally burned on the bottom and a lot of them stuck to the pan, leaving the crispy delicious crust to be washed away in the sink like so many bowls of soggy cereal. It was a travesty. The silpat will allow the potatoes to cook and get slightly crisp without sticking or burning.

IMG_5244

After about 15 minutes the potatoes should be pretty soft. Ditch the silpat at this point to let the potatoes come in direct contact with the pan, letting them really get that crispy crust that I know you all want in your fries.

IMG_5235

MEANWHILE, start heating your olive oil over LOW heat. This is for your garlic and herbs. We’re not here to cook them, just get their flavors infused into the oil.
IMG_5236

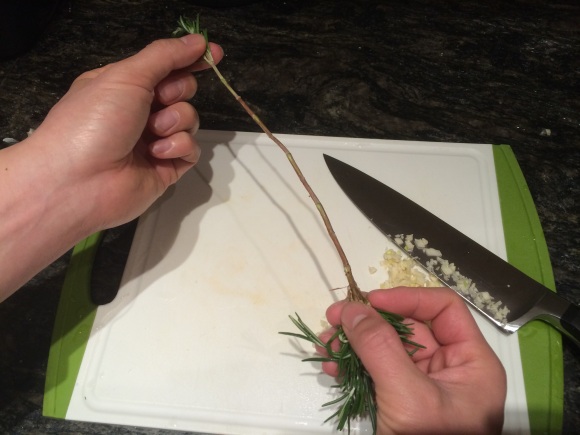
When stripping the herbs off their branches, it’s easiest to hold the top of the sprig (the end the leaves are pointing towards), then with your other hand, lightly grasp the branch and pull down, plucking the leaves off as you go. Do this with the rosemary and thyme. You know what to do with the garlic.
IMG_5242 IMG_5243

Chop up your herbs and throw it into the warm oil with the garlic. If you hear a sizzle, IT’S TOO HOT. Turn down your heat or just take the oil off the burner. Let the garlic/herbs steep a bit.

IMG_5246

After the fries have browned a bit and crisped up on the bottom, flip them all over and throw back in the oven. Bake a little longer.

IMG_5247

Throw your fries in a bowl, pour the garlic/herb/oil mixture over them, and toss. Bonus points if you can toss them by only flicking the bowl and not using any utensils.

IMG_5248

Season with a little more salt and pepper and dig the heck in.

INGREDIENTS:

1 large sweet potato
3-4 Yukon Gold potatoes
2 cloves garlic, minced
1 long sprig rosemary
4-5 sprigs thyme
About 5 tbsp extra virgin olive oil
Salt and Pepper

DIRECTIONS:

Preheat oven to 425 deg.

Peel the sweet potato. Cut potatoes into 1/2″ wide fries. Toss them in a large bowl with 1-2 tbsp of olive oil and the salt and pepper. You don’t have to be exact here, just make sure each fry is coated and seasoned. Place the fries on a large silpat placed in a cookie sheet, trying to keep each fry separate from the others. Roast for 15-20 minutes until the potatoes get soft.

Meanwhile, heat 3 tbsp of olive oil in a small saucepan over LOW heat. Strip the leaves off the herb sprigs, and give them a good chop. Add the garlic and herbs to the olive oil and let them steep in the oil. The oil should be warm but not hot enough for the garlic/herbs to fry. If you hear a sizzle when the herbs hit the pan, it’s too hot.

Remove the potatoes from the oven, then ditch the silpat. Pull the silpat out from under the fries, drizzle a little more olive oil on them (or use cooking spray), and again make sure the fries aren’t touching. Return them to the oven for 5 more minutes. Remove from oven and start flipping the fries over. The bottom of the fries should be browned by now. Continue flipping all the fries then return them to the oven for another 5 minutes.

Once the fries are browned top and bottom, remove them, then return to a large bowl. Pour the garlic/herb oil over the fries and toss quickly. Serve!

NOTE: if you don’t have a silpat, or if you want crispier fries, you don’t have to use one. Just check on them more often to make sure they’re not burning.

Tagged , , , , ,

Italian Sausage and Orzo Soup

So this happened today:

IMG_5198

Yes, #Juno was going on all day today outside my window. What’s a home cook to do? Cook I guess.

Lucky for us, I just happened to have all the ingredients for this delicious, soul-warming soup:

IMG_5145

This soup is so easy and so good. It’s one of my favorite things to whip up in the winter, and the great thing about it is that it’s made up mostly of things I usually already have on hand, and you should too.

IMG_5171

Start with the sausage. I actually don’t usually have this on hand, but it’s not a bad idea to have a couple packs in your freezer handy for pizzas, pasta sauces, etc. Remove the sausage from its casings. For me, it’s easiest to do this with a serrated steak knife.

IMG_5137

Once you’ve browned the sausage, add your onion and garlic. Those are two things you should always have on hand, BTDubs. Those are staples that you can throw into almost anything and it’ll be good.

IMG_5139

Once the onions become shiny and translucent at the edges, add your chicken stock. I always have boxed chicken stock on hand because it can add a lot of flavor to simple dishes like mashed potatoes, stir fry vegetables, pasta, and soups (case in point). In a pinch you could also just pop open box and boil up some wonton soup with it. It’s a must have.

IMG_5140

Throw in a parmesan rind. I usually have whole parmesan on hand because it’s just so much better to have fresh grated parmesan than the dry, powdery, pre-grated stuff. Parmesan is great too because it lasts forever in the fridge and once you’re through you can save the rinds in the freezer. Add the rinds to soups, tomato sauces, whatever you want to give it an extra savory, funky hit.

IMG_5141

Add your can of diced tomatoes and orzo pasta. Canned diced tomatoes are always in my pantry for a quick tomato sauce or chili or for this particular soup. I also usually have orzo… not really as versatile but it goes great in this soup and I do love a good orzo pasta salad.

IMG_5142

After the tomatoes and pasta have been cooking for 5 minutes, add your escarole and canned white beans. Canned white beans make a great bean dip (think hummus but with white beans), and are great just stir fried with kale or thrown into a bean salad.

IMG_5143

Let it bowl down and that’s it! It’s even better after it’s been sitting a while and the starch from the pasta thickens it all up. Serve with fresh grated parmesan and dig in.

INGREDIENTS:

1 lb Italian Sausage (hot or mild, up to you), casings removed
2-3 cloves of garlic, minced
1 medium onion, diced small
1 10-oz bag of chopped kale or escarole
1 15-oz can of diced tomatoes (no salt added)
1 15-oz can of white beans (low sodium), drained
1 32-oz box of chicken stock
1/3 cup of orzo
1 parmesan rind
1 tbsp olive oil

DIRECTIONS:

Heat a large soup pot over medium-high heat, add olive oil and heat, then add the sausage. Saute the italian sausage, breaking it up into small pieces. When the sausage is browned, add the garlic and onion and saute until the onion starts to glisten and turns translucent at the edges. If there is excess oil, remove some of it so there is about a tablespoon remaining. Add the entire box of chicken stock and bring to a boil. Throw in the parmesan rind. Bring back to a boil.

Add the can of diced tomatoes and bring back to a boil. Add the orzo and boil for another 5 minutes.  Add the kale/escarole and the white beans and boil for another 10 minutes, or until the greens are tender.

Remove the parmesan rind, ladle into bowls, serve with fresh grated parmesan and grilled crusty bread.

Enjoy. Winter has come.

Beer Pairing Recommendation: BEER WITH SOUP? WHY NOT? Anderson Valley Winter Solstice Seasonal Ale

Tagged , , , , , , ,

Bulgogi Ssam – Kim Chi Salsa

Hello loyal readers!

My sincerest apologies to all 12 of you for being MIA the last couple months. The truth is, once the weather got better here in Boston, this blog took a backseat to being somewhere outside in shorts and a bro tank and not freezing. I think I’ve gotten a lot of the bro-tank-wearing out of my system so I wanted to get back to it!

Another thing I’ve been meaning to talk about is this: I don’t like tons of pictures.  In fact, one point I wanted to make when starting this blog was NOT to put up a million pictures in every post.  Do you really need a picture of me adding a teaspoon of salt to a pot? That’s not exactly a culinary school skill.  That being said, I realized that I’ve started posting more and more pictures in each of my entries and become something of a hypocrite.  So from here on out I’m going to try my best to only put pictures up that I think are necessary to clarify one of my instructions. I have a feeling I’m still going to put up a ton but whatever you guys can keep me accountable.  Yes, the 12 of you.

Anyway, here’s some Korean food I recently made:

IMG_3841

This is a ssäm. It means “wrapped” in Korean. I just googled it. I’ve been eating this for quite some time in restaurants but never made it at home until I met my wife, who if you didn’t know, is Korean. It’s super easy. Also on top is a kim chi “salsa” I made.  I got the idea from David Chang on Mind of a Chef when he made a bulgogi burrito and I thought it was genius.

Okay let’s start with everyone’s favorite, the meat! Sorry if you’re favorite is actually the lettuce.

IMG_3806

Most Asian stores will have thinly sliced beef like this, sometimes labeled under “beef for hot pot” or “sukiyaki.” I went big time with the ribeye but you can also use round.

Now for the marinade:

IMG_3808

Puree your pear, your onion, and your garlic in the food processor until it looks like apple sauce like so.

IMG_3848

Add your puree to the meat, then toss in your soy sauce, your brown sugar, and your sesame oil.  If you’re using a meat like rib eye, be careful when mixing because all the marbling will make your meat literally fall apart.

The beauty of bulgogi is that it’s so thin that you really don’t have to marinate it long.  You can basically start frying it up immediately after the marinade is done.  I went ahead and let it rest for 30 minutes before starting to cook but I really don’t think you have to.

While I was waiting, I started on the kim chi salsa.

IMG_3847

Char a couple green onions for a little added roasty flavor.

Chop up your kim chi and throw it in a food processor with your green onions.

IMG_3826

Chop until everything is coarsely ground. Next add your cilantro and a squeeze of lemon (or lime)

IMG_3827

Process some more and you’ll be left with something that you could serve at your local taqueria! Or if you live in Boston, Qdoba.

IMG_3830

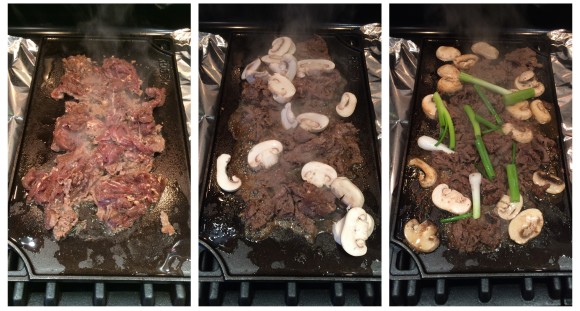
Okay let’s get back to the meat. It’s been marinating for a little while now, so all you need to do is throw it on the griddle.  If you don’t have a griddle, you can use a large skillet, but make sure you cook in small batches, otherwise all the liquid will come out and you’ll end up boiling the meat rather than grilling it, and that’s not nearly as delicious.

IMG_3846

You’ll notice I added some mushrooms and green onions to the grill. This is up to you if you want to do it.  Either way it will taste great.

BTW, I highly recommend getting a cast iron griddle/grill pan.  I use that bad boy all the time and get great results every time.  Make sure all the liquid cooks out and the meat actually starts to brown! It’s gotta be a little crispy otherwise you’re doing it wrong.

IMG_3839

Glorious.

You can eat this as is, or wrap it up in your favorite wrapper (seawead, rice noodles, or good ol’ red leaf lettuce) with rice, some ssamjang, and the kim chi salsa. Enjoy y’all.

BULGOGI:

1 Asian pear or crisp Bartlett pear
1 small onion
4 cloves garlic
1.5 lbs thinly sliced beef tenderloin or rib eye
1/4 cup soy sauce
1 Tbsp dark soy sauce
2 tsp dark brown sugar
A good squirt of sesame oil (about 1 Tbsp)

Pulse the pear, the onion, and the garlic in a food processor for about 15-20 seconds, or until it looks like applesauce. Combine the pureed mixture, the beef, both soy sauces, sugar, and sesame oil into a large bowl and mix gently to combine.

Once all ingredients are incorporated, heat a griddle over medium-high heat, or a 12″ skillet over high heat.  Add a little oil to the cooking surface and cook your bulgogi in batches.  Make sure not to crowd the cooking surface or too much liquid will run out of the meat and it will start to boil the meat rather than brown it.

Optional: add sliced mushrooms and green onion to your bulgogi while it’s cooking.

KIM CHI SALSA:
1 1/2 cups kimchi, roughly chopped
2 green onions, charred on grill
1 Roma tomato (optional)
Juice of half a lemon
Half bunch of cilantro (about 1 cup loosely packed)
Fresh ground black pepper

Char green onions and tomato on the grill, until they are slightly blackened.  Add everything to the food processor except the cilantro and pulse until finely chopped.  Add the cilantro and continue to pulse until it is a smooth, salsa-like consistency.  Serve it!

SSAMJANG:

No ssäm is complete without ssamjang, or literally, “sauce for ssäm.” So here’s the wife’s recipe for the sauce.  It’s so good.

1 part gochujang (Korean sweet red pepper paste) to 2 parts doenjang (Korean fermented bean paste, or Korean miso as some have called it).

That’s it.

Happy ssäm-ing.

Beer pairing recommendation: Stone Go To IPA. It’s light, it’s crisp, it’s refreshing, but still packs enough hoppy, citrusy flavor to make it interesting.  Would go well with the fruity flavor of the bulgogi and stand up to the strong taste of the kim chi and ssamjang.

Tagged , , , , , , , , ,

Pesto Couscous Salad

So I actually just made this recipe up as I went along and it turned out to be pretty good, so I decided to put it up on the blog. Sorry I didn’t take any prep pictures, but… it’s a salad.

20140130-223943.jpg

Pesto Couscous Salad

2 cups couscous
2 cups low-sodium chicken broth, hot
½ bunch of kale, tough stems removed, chopped
½ cup pitted kalamata olives, sliced lengthwise
¼ cup sliced sun-dried tomatoes packed in olive oil (or more to preference)
¼ cup basil-arugula pesto
1 ½ tbsp. extra virgin olive oil
Juice of 1 lemon
Salt and pepper

Heat oil in a 2-qt saucepan over medium-high heat. Toast the couscous for 2-3 minutes until lightly browned, then add hot chicken broth. Lower heat to medium-low, cover, and simmer for 12 min, or until all the liquid is absorbed. The couscous should be firm but tender, like the Old Spice guy. Or like al dente pasta.

As soon as the couscous is cooked, and while still hot, add the chopped kale and toss until it is wilted and bright green. Add all the other ingredients and toss, season with salt and pepper, serve at room temperature.

Tagged , , , , ,

Herbed Brussels Sprouts Hash

Mmm, weekend hash.  Weekend hash is a staple in my house, and today I had some leftover roasted Brussels sprouts to add in. I tend to throw a lot of random leftovers into my hash, some common ones being: peppers, asparagus, onions, oh, and fried SPAM (my personal favorite).

I also cheat a little when I make hash. Usually I just throw the potatoes in the microwave for 5 minutes to cook them first to save on cooking time. Hopefully I’m not zapping all the nutrients out of them.

There are 3 tricks to making a good hash: 1) A good amount of oil/butter, 2) A heavy skillet, 3) Pacing. When cooking on the stove, potatoes will take a long time to develop that crispy, delicious crust we all love, and if you throw everything into the skillet all at once, everything else will burn before getting that crust. Also, you need a good amount of oil and a nice, heavy, thick-bottomed skillet that will disperse heat evenly and retain that heat so the potatoes don’t burn. I like using a cast-iron skillet for hash and I recommend you do too.

One more thing. I’m definitely not an all-organic Whole Foods nut, but one thing I try to always buy organic are potatoes. Apparently non-organic potatoes have the highest pesticides content among all conventionally grown fruits and veggies. Also I really think they taste better, and they’re not that much more expensive.

20140119-154819.jpg

Start with heating up the skillet on medium heat. Melt some butter, add your potatoes, and season. Toss a little to evenly coat, then just let it sit. I guess I forgot one more trick: 4) Resist the urge to keep tossing around your potatoes. They need prolonged contact with the skillet to develop a crispy crust, so wait about 30-45 seconds between tosses.

20140119-154810.jpg

Once the potatoes brown a bit you can add the Brussels sprouts and garlic.

20140119-154759.jpg

Let everything brown and crisp up a bit more, then add your herbs. I had some rosemary, sage, and thyme leftover from a poultry blend I bought so I threw that in.

20140119-154752.jpg

Last but not least, add your green onions.

20140119-154746.jpg

What a fine looking hash.

20140119-154738.jpg

Of course no hash is complete without a couple fried eggs on top. Let that yolk run all over the hash, throw a little hot sauce on, put on some Saturday morning cartoons, and you’re good to go.

20140119-154731.jpg

Herbed Brussels Sprouts Hash

1 tbsp butter
1 tbsp olive oil
3 medium-sized organic yellow potatoes
1/2 lb (about 1 1/2 cups) leftover roasted Brussels sprouts (recipe below), quartered.
3 green onions, sliced
3 cloves garlic, sliced thin
1 1/2 tsp fresh thyme (about 3 sprigs, leaves stripped off), finely chopped
1 tsp fresh rosemary leaves, finely chopped
6 sage leaves, finely chopped
Lawry’s Seasoned Salt
Fresh cracked black pepper
2 eggs

Wash the potatoes in cold water, then arrange them in a single layer on a microwave-safe plate.  Microwave on High for 5 minutes. The potatoes will be too hot to handle after microwaving, so it will be a good time to wash and prepare all the other ingredients while they cook and cool. Once the potatoes are cooled, cut into 1″ cubes.

Heat a cast-iron skillet on medium heat, melt the butter. Next, add the cooked potatoes and season well with seasoned salt and pepper (give them a good dusting all over the top). Toss to combine and to evenly coat each piece with seasoning, then let the potatoes sit.  Toss every 30-45 sec until the potatoes start to get crispy all over, about 4-5 minutes. Add the garlic and Brussels sprouts. Again toss and let sit between tosses, until everything gets browned and crispy on the sides, about 3-4 more minutes. Add the herbs, toss gently, then add the green onions.  You might need to add a little olive oil at this point so the herbs and onions don’t burn.  Also, if the vegetables start to get too browned, you may need to lower the heat to medium-low.

Again toss to combine, cook for another 2-3 minutes, and serve it on a plate with 2 fried eggs.

Roasted Brussels Sprouts:

1 lb bag of large Brussels sprouts
1 tbsp olive oil
Garlic Salt
Pepper

Pre-heat oven to 400 deg
Wash and halve all Brussels sprouts lengthwise, place in a baking pan, coat with olive oil, season with Garlic salt and pepper, and throw in the oven. Roast for 30-40 minutes or until sprouts are tender. Great, healthy side dish to go with any pasta or meat dish. You can also add some feta and balsamic vinegar if that makes you happy.

goodwilltasting beer recommendation: I don’t think there’s anything wrong with a little brunch beer. A nice beer cocktail would be even better. I’m thinking something with Allagash White, a little ginger syrup or ginger beer, and orange juice. I’ll see if I can find a recipe for this.

Tagged , , , ,

GWT Mapo Tofu

Tofu gets a bad rap. Maybe because people try to parade it around like it’s something that it’s not. I’m looking at you, Tofurkey! Here’s a traditional Chinese way to cook tofu that is comforting, easy, and DELICIOUS.

20140115-231316.jpg

Listen, don’t be intimidated by the Asian ingredients.  These days, this stuff can be found in most grocer’s Asian/Spanish food aisle. It always makes me laugh when I see those two food categories right next to each other at the market. Do we both really have to be marginalized to just half an aisle in the entire store? Also, why so pigeonholed, America? Where’s the half aisle of Moroccan food products? Or Portuguese products? I feel like I should start a petition. Also, if you really just can’t find that stuff, you can always order it online at Lee Kum Kee.

Anyway, three of the most versatile Chinese ingredients you can buy are up there: black bean sauce, chili garlic sauce, and the ubiquitous oyster sauce. Throw some black bean sauce into your next stir fry for a great savory boost, use chili garlic sauce in place of any hot sauce you might use, and any vegetable can be made better with oyster sauce.

Or you can mix them all together and make mapo tofu.

20140115-231329.jpg

Start with cutting up the tofu right in the container if you like. I usually use soft tofu for this dish so I keep my chunks pretty big at the beginning since it will pretty much break apart by itself as I cook.

20140115-231341.jpg

20140115-231355.jpg

20140115-231403.jpg

Next I fry up the garlic and pork, add the sauces and chicken stock, and let that all simmer a bit before adding the tofu:

20140115-231411.jpg

Keep simmering then add the corn starch water to thicken. Make sure you mix it good, it should look like milk before you pour it in. Dissolving the corn starch in water rather than just throwing it straight into the sauce will keep it from clumping up into disgusting snot-like corn-starch boogers wading in your tofu. So DO IT.

20140115-231434.jpg

Finally add the Sichuan pepper sauce and oyster sauce and stir to combine. Many traditional recipes will have you start with whole Sichuan peppercorns, crush them up with a rolling pin, then toast them in the wok first before cooking everything else. You can definitely do that too, you’ll get the same effect.

Note: If you’ve never had Sichuan peppercorns in a dish before, you might be in for a surprise. They’re not so much spicy as they are “tingly.” I don’t know the biochemical reaction that happens once it hits your tongue, but Sichuan pepper has this tingling, numbing effect that will give your tongue a buzz.  It’s wild.

20140115-231420.jpg

Note: Try not to overstir, and use folding motions each time you mix rather than circular motions.  Every time you stir you run the risk of breaking apart the pieces of tofu, and over-stirring can really leave you with tiny bits of tofu.

Serve with steamed rice, and if you have a friend who is not a tofu fan, I dare you to challenge him to try this and still tell you he doesn’t like it. CHALLENGE HIM! Because he just might get embarrassed.

Enjoy!

20140115-231441.jpg

GWT Mapo Tofu

1-lb block of soft tofu, cut into 1” cubes
1/3 pound ground pork
1 cup chicken stock
3 cloves garlic, minced
1 tbsp oyster sauce
1 tbsp. garlic black bean sauce
1 tbsp. chili garlic sauce
1 tbsp corn starch dissolved in 1 tbsp water
1 tbsp canola oil
1 tsp schezuan chili sauce or schezuan peppercorns crushed
Chopped scallions for garnish

Heat oil in wok over high heat and add pork, breaking it up so it is crumbled. When pork is browned, add garlic and cook until fragrant. Add black bean sauce, chili garlic sauce, and chicken stock to the pork, stir until combined, then add the corn starch+water so the liquid thickens into a sauce.  Add the tofu to the sauce and toss GENTLY to coat the tofu, being careful not to turn the tofu into mush. Cover pot and lower heat to a simmer for 5 min, uncover and add oyster sauce and Sichuan pepper sauce, stir again to combine.  The tofu should have firmed up a bit by this point but still be careful not to break it apart.

Sprinkle with scallions, serve with steamed rice.

goodwilltasting beer pairing suggestion: Brooklyn Lager

Tagged , , , , ,

The Best Roasted Garlic Mashed Potatoes

Listen to me. These are the best mashed potatoes you might ever make in your entire life.  I really don’t have anything else to say so here’s the recipe:

20140110-225707.jpg

Start with the roasted garlic. Roasted garlic is great just on its own. Seriously. It becomes soft and spreadable like little garlicky pats of butter. But it’s a vegetable so it’s healthy. Right? Sometimes I’ll pop a couple cloves into my mouth before throwing them into the mashed. It’s also great on grilled slices of baguette, thrown into an omelette, blended into hummus or mayonnaise, etc, etc, etc. So here’s how to do it: Chop off just the top of the bulb, exposing the tops of the raw cloves underneath.  Sorry for the old garlic picture, but I assure you it’s still just as tasty.

20140110-225617.jpg

20140110-225628.jpg

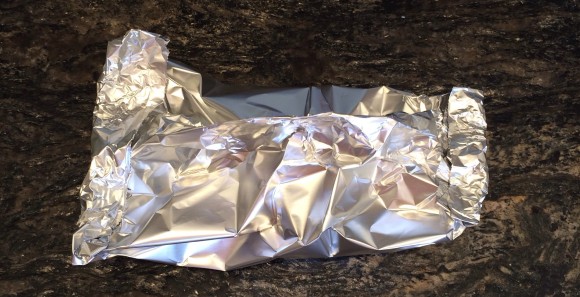
Drizzle some olive oil on the top of the bulb, season with salt and pepper, throw in some herbs if you got em (I threw in a couple rosemary leaves), and then wrap it up in a loosely folded pouch.  It needs to be sealed but make sure it’s easy to open up so you can check to make sure it’s done. The cloves should be shiny and golden brown when done. Then all you have to do is squeeze the bulb like a toothpaste tube and peel back the garlic paper to get all that goodness out. Check it:

20140110-232534.jpg

20140110-232548.jpg20140110-225820.jpg

20140110-232611.jpg

I like to use a ricer when I make mashed potatoes. If you like yours chunky, feel free to go old school and use a masher or even a big fork.

20140110-230100.jpg  20140110-235621.jpg

20140110-225847.jpg

20140110-232655.jpg

Ingredients:

3 lbs yellow or white potatoes, peeled and cut into large chunks (1.5″ cubes)
1/2 pint heavy cream
1/2 cup sour cream
1 whole small bulb garlic
5 oz parmesan cheese, grated
salt/pepper
Chicken broth
butter
olive oil

Pre-heat oven to 400 deg
While heating cut the top off the whole garlic bulb, exposing the tops of each clove, drizzle olive oil over it, and season with salt and pepper. Place the bulb in a foil pouch, close it and roast for 45 min. If you have any fresh herbs you can throw it in the pouch as well. Roast until it’s soft and golden brown, then when it’s cool squeeze out the garlic into a bowl and mash with a fork.

While garlic is roasting, cook potatoes in salted boiling water for 10 min or until you can stick a fork in it easily to cut it in half. Mash the potatoes well or use a ricer if you have it. Add the cream, sour cream, and salt/pepper to the potatoes and stir to combine. The initial consistency should be relatively thin, almost like a thick soup, so add more cream or chicken broth to thin it out. Don’t worry it will thicken again as you mix it around. Mash the garlic cloves into a paste with a fork, and add that and the Parmesan to the potatoes and mix. Add a few pats of butter at the end if you wanna make it even more rich, or serve as is.

Enjoy!!

Tagged , , ,